Monday 1 June 2015

Module 4 - Chapter 11 - Make a Special Structure Related to Media

Whilst working through the chapters in this module, it has become annoyingly apparent that I had not included email and social media in my initial research, and yet it is such an integral part of our everyday lives.
4.11.01

4.11.02

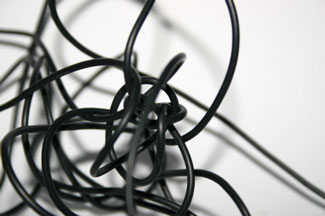
I have also recently had to buy a new computer after my old one crashed. In the process of updating operating systems, I found myself confused by a bombardment of ‘apps’ instead of programs, lost files and various compatibility issues!

Inspired, if not frustrated by this, I did a little image research on Google. I came up with the idea of a grid-work pattern of social media icons as appears on iPhone etc, all joined together with a tangled arrangement of black cord resembling the spaghetti like mess of cables and wires that we all have hiding behind our TVs and computers, even in this new age of Wi-Fi.

4.11.03


Excited by this, my next decision was how I should present the icons, and what would be their purpose?

I soon stumbled upon the idea of folding the icons into a box, or cube. All sides would be connected, with no opening. No visible access. No way of getting inside. The idea being that inside this box is all my emails, corrupt files and lost data that I can no longer gain access to!


4.11.04


I made a 'prototype' box to ensure that the structure would hold its shape.

4.11.05

The plan was to use a selection of different embroidered panels for each of the little squares, but Sian felt that the right side of the recycled cereal packets would made an interesting contrast.

4.11.06

I took a little persuading, but once these were decorated with PVA text and embellished with gold 'rub-on' I had to agree that it created a lot more interest, and also followed the theme of recycling found items from summer school.

4.11.07

The third group of 'icons' were metal rectangular frames, wrapped with thread and dipped in paper pulp.

4.11.08


The final grouping gave a varied and contrasting arrangement of 'icons',  Holes were punched around the edges of the squares using a leather punch (thanks to 'the Alisons' for that suggestion at Summer School) that were then joined together with  thin electrical LED wire.

4.11.09


4.11.10

4.11.11

4.11.12

4.11.13

Sian suggested it might be a good idea to 'mount' the box on more tangled wire. I played around with different arrangements of 'mess', but found that if I spiraled the wire like telephone wire, it had a lot more strength and stability and was able to support the box. This enabled me to display the box at an asymmetric angle.

I am exhibiting the box at our 'Stitchers' biennial exhibition and felt I needed to explain the idea and inspiration behind the box, so I mounted it on a mirror (inspired by Sian's Murmurations) edged in black card and wrote the inspiration for the piece around the edge. 

4.11.14


4.11.15


Friday 20 February 2015

Module 4 - Chapter 10 - Book-Type Structures to Try Out

Using dyed & stained scrap paper I experimented with various mock-ups of structural forms to see how many different ways that a book could be constructed.

1001
Clockwise from left: machine stitched concertina book with pages of differing widths, two narrower 'books' oversewn to a central, wider book with oversewn spine, double pamphlet stitched spines with a fold in the middle, bi-folded book with machine stitched spines, pamphlet stitched book with pages of different widths, 4 pamphlets stitched through a cover layer to form a decorative spine.

1002
top left & right, unusual and unconventional ways of suspending books
Bottom left, a book with concerina pages, bottom right is formed by an ingenious method of folding and cutting a large sheet of paper. 

1003
Different methods of stitch were used to connect the pages together. From left to right, top row: buttonhole stitch with jute, gold thread, elastic band with wooden toggles, strings of beads, a stick attached with jute thread, tied raffia. Bottom row: a collection of various blue threads, ribbon, jute, a length of scrim, wool & oversewn raffia.

This was an interesting and valuable exercise. It gave me a lot of ideas and options to think about for my assessment book structure embroidered panel.

Saturday 31 January 2015

Module 4 - Chapter 9 - Stitched Edges

Experiments with stitch to decorate the edges of hand made paper:

0901
The paper edge was folded and glued to give a firm surface. A punch was used to create holes. Raffia and hemp were threaded through the holes forming an over-cast pattern.

0902
A synthetic fabric was wrapped over the edges of the paper. Overcast stitching was used around the edges to hold the fabric to the paper. The excess fabric was then melted away using a heat tool.

0903
An automatic machine stitch was used to decorate the edge of the paper. This was combined with blanket stitch, hand stitched around the edge.

0904
An automatic machine stitched was worked around the edge of the paper, placing thread fibres underneath the stitching to give a soft, irregular appearance.

0905
An undulating rhythm of rough jute parcel string was couched down around the edge of the paper with contrasting cyan embroidery thread. 

0906
Fly stitch was worked around the edge of the paper in groups of three. The turquoise stitch on the outer edge was beaded.

0907
A thin, torn strip of indigo scrim was attached to the edge of the paper using small groups of blanket stitch worked in gold thread.

0908
A piece of blue handmade paper with an irregular edge was attached to a slightly larger sheet of white handmade paper with a more regular edge. This was decorated with randomly spiralling brown free machine stitching, and then in contrast, a row of gold automatic machine stitch in a star pattern was worked close the the edge.

0909
Lock stitch was worked around the edge of the paper with a clump of blue threads stitched around the outer edge, and beige/gold threads stitched around the inner edge. The outer edge was further decorated with beads.

Samples 0906, 0907 & 0909 were inspired by Jan Beaney & Jean Littlejohn's book 'Stitch Magic'.

Monday 19 January 2015

Module 4 - Chapter 8 - Stitchery into Paper

...so, last year I was incredibly stuck on this chapter.

The idea was to embroider into the papers with the embedded grids, made in the last chapter, using any type of stitchery. The stitching should echo some feature in the research theme of lettering and media patterns.

...then Christmas got in the way!

Fortunately, inspiration struck in the New Year.


040801
Groups of withdrawn threads were bound with buttonhole stitch to create hotizontal bands of stitch. Straight stitches were worked into the paper borders to extend the pattern.

04802
Herringbone stitch was worked in rows to form blocks of pattern. These blocks were then worked perpendicular to each other, diagonally across the grid.

040803
Fly stitch was worked in groups of 3 and overlapped randomly in blue and black thread.

040804
Metallic gold cretan stitch was worked over a machine stitched grid. Torn strips of black fabric were tied to some of the stitches.

040805
Long legged french knots were worked in varying thicknesses of black, blue and red thread, at right angles over the grid.

040806
Straight stitches of blue rafia were worked into a metal grid in geometric shapes to echo hieroglyphs.

040807
Cross stitch was worked in various sizes using varying thicknesses threads.

040808
Using the sewing machine, threads were cable stitched vertically across the grid. Horizontal rows of blanket stitch were worked in various sizes, thicknesses, and colours of thread.