Saturday 21 September 2013

Module 3 - Chapter 10 - Design an Accessory

Looking back at my research images collected earlier in this module, I selected a few that I felt suggested an inspirational idea for an accessory.

3.10.01

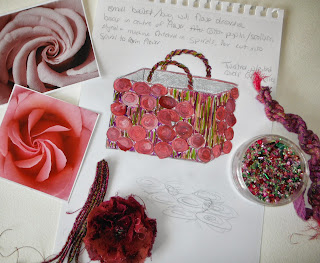
The images of the roses with their soft, delicate folds of spiralling petals would look lovely covering a bag. I felt that a small, rigid, rectangular basket style bag would contrast nicely with the softness of the fabric flowers. My original idea would have been to cover the entire bag with flowers, but then I felt that this might look a bit 'manufactured'. A background of machine stitched cords would give the impression of age and wear, as if some of the flowers had worn away or fallen off with age, or perhaps a little patchy, as if they hadn't grown there in the first place.

I machine stitched a piece of dyed scollata in a spiralling vermacelli pattern, then cut a circle, spiralling inwards to the centre. I then twisted, folded and stitched the pleats, fraying the edges as I went along, to form a tatty flower. I then beaded the centre with random pink, red & green beads of differing sizes. I think the fabric would need to be dyed randomly in different shades of reds & pinks to give variation in the flowers.

I cut a few lengths of my cord left over from the previous chapter and stitched these together tightly to form a dense, firm new fabric. This would be the background to the flowers. The cords had been stitched with metallic thread which gave a little bit of sparkle. I would have to decide if I wanted this sparkle in the background, or not.

The handles would probably be made from macrame knotted cords. I like the sample I made in chapter 5 as it forms a nice firm spiral. This would make an excellent bag handle.

3.10.02

I was really excited by my flower samples, but as I had made a bag in a previous module, I thought it might be a good idea to apply the ideas to a different accessory. Looking back again at some of my inspirational images, I thought a hat might be fun to make. Perhaps a 'mad-hatter' style hat, with a lop-sided, spiralling element at the top, similar to my 3D cardboard shape.

3.10.03

I would use the same corded background and fabric flowers as on the bag above. It would be interesting to make the brim from the same cords used in the background, but pehaps spiralled and stitched together to form a loopy, lacy effect. I made a sample of this, it created a nice firm fabric which would be perfect to mold and shape into a hat brim. I am a bit concerned, though, that the hat and its brim might not appear to be coherent.

Totally coincidentally (as I had sketched these designs before it was released), I took delivery of Jean Draper's new book, 'Stitch and Structure'. It is an incredible book, and so relevant to this module as it is bursting with the most amazing structures made from wrapped & twisted cords!

3.10.04

From the very first chapter in this module, I have been inspired by 'Orbit', the viewing gallery at the Olympic Stadium. I have felt all along that the design would lend itself to a long, spiralling bracelet. I had been reading Valerie Campell-Harding & Maggie Grey's book 'Stitch Disolve Distort', and wanted to play with Sizoflor, a fabric often used by florists. I thought this would be fun to decorate with machine stitch spirals, as in Chapter 4, then to burn away some of the sizoflor with a heat gun. I painted the sizoflor with pink lumier paint and sandwiched snippets of fabric and fibres between 2 layers of fabric before stitching.

3.10.05

The plan would be to decorate this fabric further with beads of various sizes, and different shades of pink & green. Although it is already quite firm, this would need to be stiffened, and twisted to form a permanent spiral. I have some Paverpol to experiment with.....!

The bracelet would then be draped and decorated with knotted cords stitched randomly and perhaps spiralling in the opposite direction to the sizoflor bracelet, similar to the loose ironwork twists around the 'Orbit' construction.

I am concerned that, even after being stiffened with paverpol, the sizoflor bracelet might not be strong enough to hold the knotted cords.

3.10.06

My last design is inspired by the fruit of a clematis. As I failed to dead-head mine as the flowers died away, I have been left with the most amazing spiralling green pods. I attempted to re-create one of these pods with a thin machine stitched cord, that I wrapped tightly around a tube, and painted with paverpol. When it was dry, I tied the loops in the centre & fanned the spirals out into a round shape.

For the flower petals, I decorated 2 layers of organza with spiralling machine stitchery, topping this with a cabled spiral, then stitched and cut petal shapes from the resulting fabric. These petals would be stitched together and beaded in the centre.

Thicker cords would be made with a length wire inside core, or perhaps wrapped with wire, to create elaborate spiralling tendrils.

At this moment I am not sure how these elements would be held together, or how the fascinator would fit onto the head.

Now to decide which design to take through to the next chapter...!!!

Saturday 31 August 2013

Module 3 - Chapter 9 - Resolved Sample

Looking back at my research on spirals in Chapter 1, I selected a few images that appealed to me, and masked out areas that I thought might provide an interesting design to use for my resolved sample.

3901
After seeing an untitled machine embroidery by Helen Banzhaf at the 62 Group exhibition at Goldsmiths, I really wanted to try working on something in a long, narrow format.


3902
The sketch above was taken from the book 'The Grammar of Ornament' as part of ornament from Oceania. I really like the depiction of movement in the cropped and enlarged image on the left.

3903
The spiral staircase, or shell design gave an interesting segmented pattern when moving a 'window' across the centre. I developed this further by use of the fibbonacci series.

3904
A cropped section of the square spirals also gave an interesting design.

3905
I decided to go with the Ociania image and made a list of the techniques I would like to explore:

I started off with three layers of hand dyed fabrics (on a calico base) as I wanted to use reverse applique from Module 1.

3906
I tacked the layers together and transferred the design onto the calico backing by use of a transfer pencil. I then stitched from the back, and cut away the layers on the front. I was a little disappointed that the cerise lozenges top and bottom lay beneath a cerise section on my top layer of fabric. I had hoped that these would stand out like jewels against the background without too much further embellishment.

3907
I stitched into the centre of the lozenges with whipped stitch on my machine using pink and maroon thread, just to create a tiny bit of interest texture, then hooped from reverse and stitched heavy textured spiralling and meandering cable stitch from the back.

3908
3909
I wanted to incorporate tyvek beads, and following my disappointment in Chapter 7, I watched a few tutorials on you tube. I painted one side in pink, and the other side in green lumier paints, then zig zag stitched the tyvek with pale green variegated thread. I cut the tyvek into small triangular strips, serrated the edges, then zapped with the heat gun, et voila!

3910
Success! More treasure! I am very happy with the resulting crunchy textural beads. The lumier paint has sort of seperated, giving a gold edge to the tyvek strip as it retracted from the heat. A bigger bead would be amazing wrapped with wire and beads!

3911
I then made a few miles of machine stitched cords. One using a core of space dyed string stitched with pink/maroon variegated thread, and the other, a thicker cord, using a core of purple and maroon tapestry threads stitched first with maroon and metallic cerise thread, and then with lime green and a dark metallic green thread.

3912
The beads were threaded onto the cords which were knotted and spiralled and then couched down onto the bands between the lines cable stitch, creating a heavily textured 'raised surface', seperated by the low relief of the lime green reverse applique bands.

3913
My plan was to further embellish the bands by randomly beading the cable stitch to add a bit of sparkle, but felt that this detracted from the texture and dull sheen of the tyvek beads and the knotted cords, it didn't need the glitz, so these were removed!

3914
I was still a little disappointed with the lozenges in the cerise bands. Although I wanted these sections to be low relief to contrast with the busy chunky texture of the bands, I'm a bit bothered that they are almost lost. It would almost be better that they were not there at all!

3915
I experimented with beading the lozenges with a contrasting colour,

3916

3917
and then with a similar colour,

3918
but I felt that these areas were then taking too much attention away from the textural bands.

3919
I considered 'seeding' the cerise band with a grey/green thread in order to make the lozenges stand out a little better, but was not happy with this!

3920
It then occurred to me that if I clipped a little closer to the stitching, I would expose more of the green layer to surround the lozenges. This made them stand out better against the cerise background whilst not fighting against the textured bands and gave a much more pleasing result, so although I was eager to add more stitching & embellishment I decided that now was a wise place to stop before going too far and spoiling the effect.

3921
 After stitching down the loose cords at the sides of my work, I mounted the sample onto thick card and laced the back tightly.

3922

Saturday 24 August 2013

Summer School & Zandra Rhodes Spirals!

Sue Dove's workshop at Summer School this year encouraged us to work freely with colour and random images to develop design inspiration. Spirals were an obvious choice of shape to include!

Various froms of printing, monoprinting and stencilling were incorporated into designs alongside cut-out montages of magazine images blended with bands of colour using wax pastels. I was very excited by the zigzag spiral.


A visit to the Zandra Rhodes exhibition in London unearthed an array of spiral design inspiration.


wallpaper designs


more wallpaper designs reproduced using potato prints and paper stencil


wallpaper


beads & sequins


wallpaper


prints (discharge or bleach?)


print


beaded & sequined panel


epaulette on jacket


decorated rosette


I was amazed to see that Zandra Rhodes had been inspired by my zigzag spiral from Summer School! lol! 

Tuesday 23 July 2013

Module 3 - Chapter 8 - Beaded Sampler

As a background to my beaded sampler I used dyed linen fabric backed with muslin. This was then stretched into a wooden frame for support whilst stitching.

3801

3802
 From left to right, from the top, an edging row of seed beads; alternating seed beads, and round green beads; an edging of clustered pink seed beads (inspired by Jenny Marty's beautiful bracelet); pink round beads oversewn with pink cotton thread; towers made up of a seed bead, on top of a sequin, on top of a vertical bugle bead, on top of a square bead; a green circular paperclip couched with pink thread, surrounded by mini sequins & bugle beads; matchsticks trapped under red sweetie wrapper.

3803
 ...alternating seed beads, and round green beads; alternating pink seed beads & red bugle beads; and edging row of green bugle beads threaded either side of a lime green beed; spiralled curtain hooks decorated with green seed beads; 2 lines using more than one type of bead; a compact area using more than one type of bead; a pattern made with tile spacers stitched with metallic thread and decorated with a bead at the intersection; alternating groups of beads and sequins threaded in groups as an edging.

3804
 ... a sequence of red beads & bugle beads threaded in groups of 3; small painted seeds (from a tree in India) held down with knotted thread; 4 cowrie shells (inspired by a Kalashi headdress belonging to Angela Thompson's collection) edged with 4 small sequins held down with long legged detaiched chain stitch; a large group of sequins threaded either side of a large pink bead and stitched down to form an edging; painted tap washers trapped loosely under green dyed plasterers scrim; a pattern of square glass beads held down with a cross stitch alternated with round plastic children's beads.

3805
... a random selection of buttons piled on top of eachother; rows of sequins each threaded onto one long length of yarn; a random selection of lightly spinkled beads, including shisha glass stitched down with embroidery thread; bugle beads held down in groups of 2 with a cross stitch and forming a basketwork pattern; large beads stitched down in groups of 3 to form an edgining.

3806
 The bottom of the main panel is edged with double rows of random coloured seed beads.

3807

The pieced bottom section (inspired by Module 1) is held on with beaded safety pins (inspired by a visit to the Zandra Rhodes exhibition); the chain (inspired by the Angela Thompson headdress, and also synonymous with Birmingham) is held down with clusters of green seed beads; bottom row from left to right; a fringe of large random pink beads & sequins; rows of green seed beads & bugle beads forming a pattern, with occasional beaded loops at the bottom; seed beads and bugle beads in a fringe decorated with bells (inspired by the Angela Thompson headdress) a lattice pattern of pink seed beads made by catching a bead from the previous row.


In June this year, Angela Thompson visited our local embroidery group with a collection of emroidered garments that she had collected on her travels around the world.
Amongst her collection was this headdress worn by the Kalash women, a tribe found in the Chitral Valley on the Pakistan/Afghan border.
The Kalasha people are a peace loving pagan tribe living in remote villages and renowned for their blue eyes and fair skin. They are said to be descendants of Alexander the Great.
I was inspired by the use of shells, bells, buttons and chains amongst the beads on the headdress and felt this would be a useful reference for my beaded sampler!


kalash 1

kalash 2

kalash 3

kalash 4