 |
| 3.10.01 |
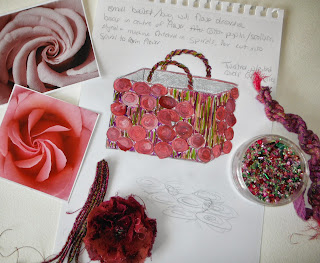
The images of the roses with their soft, delicate folds of spiralling petals would look lovely covering a bag. I felt that a small, rigid, rectangular basket style bag would contrast nicely with the softness of the fabric flowers. My original idea would have been to cover the entire bag with flowers, but then I felt that this might look a bit 'manufactured'. A background of machine stitched cords would give the impression of age and wear, as if some of the flowers had worn away or fallen off with age, or perhaps a little patchy, as if they hadn't grown there in the first place.
I machine stitched a piece of dyed scollata in a spiralling vermacelli pattern, then cut a circle, spiralling inwards to the centre. I then twisted, folded and stitched the pleats, fraying the edges as I went along, to form a tatty flower. I then beaded the centre with random pink, red & green beads of differing sizes. I think the fabric would need to be dyed randomly in different shades of reds & pinks to give variation in the flowers.
I cut a few lengths of my cord left over from the previous chapter and stitched these together tightly to form a dense, firm new fabric. This would be the background to the flowers. The cords had been stitched with metallic thread which gave a little bit of sparkle. I would have to decide if I wanted this sparkle in the background, or not.
The handles would probably be made from macrame knotted cords. I like the sample I made in chapter 5 as it forms a nice firm spiral. This would make an excellent bag handle.
 |
| 3.10.02 |
I was really excited by my flower samples, but as I had made a bag in a previous module, I thought it might be a good idea to apply the ideas to a different accessory. Looking back again at some of my inspirational images, I thought a hat might be fun to make. Perhaps a 'mad-hatter' style hat, with a lop-sided, spiralling element at the top, similar to my 3D cardboard shape.
 |
| 3.10.03 |
I would use the same corded background and fabric flowers as on the bag above. It would be interesting to make the brim from the same cords used in the background, but pehaps spiralled and stitched together to form a loopy, lacy effect. I made a sample of this, it created a nice firm fabric which would be perfect to mold and shape into a hat brim. I am a bit concerned, though, that the hat and its brim might not appear to be coherent.
Totally coincidentally (as I had sketched these designs before it was released), I took delivery of Jean Draper's new book, 'Stitch and Structure'. It is an incredible book, and so relevant to this module as it is bursting with the most amazing structures made from wrapped & twisted cords!
 |
| 3.10.04 |
From the very first chapter in this module, I have been inspired by 'Orbit', the viewing gallery at the Olympic Stadium. I have felt all along that the design would lend itself to a long, spiralling bracelet. I had been reading Valerie Campell-Harding & Maggie Grey's book 'Stitch Disolve Distort', and wanted to play with Sizoflor, a fabric often used by florists. I thought this would be fun to decorate with machine stitch spirals, as in Chapter 4, then to burn away some of the sizoflor with a heat gun. I painted the sizoflor with pink lumier paint and sandwiched snippets of fabric and fibres between 2 layers of fabric before stitching.
 |
| 3.10.05 |
The plan would be to decorate this fabric further with beads of various sizes, and different shades of pink & green. Although it is already quite firm, this would need to be stiffened, and twisted to form a permanent spiral. I have some Paverpol to experiment with.....!
The bracelet would then be draped and decorated with knotted cords stitched randomly and perhaps spiralling in the opposite direction to the sizoflor bracelet, similar to the loose ironwork twists around the 'Orbit' construction.
I am concerned that, even after being stiffened with paverpol, the sizoflor bracelet might not be strong enough to hold the knotted cords.
 |
| 3.10.06 |
My last design is inspired by the fruit of a clematis. As I failed to dead-head mine as the flowers died away, I have been left with the most amazing spiralling green pods. I attempted to re-create one of these pods with a thin machine stitched cord, that I wrapped tightly around a tube, and painted with paverpol. When it was dry, I tied the loops in the centre & fanned the spirals out into a round shape.
For the flower petals, I decorated 2 layers of organza with spiralling machine stitchery, topping this with a cabled spiral, then stitched and cut petal shapes from the resulting fabric. These petals would be stitched together and beaded in the centre.
Thicker cords would be made with a length wire inside core, or perhaps wrapped with wire, to create elaborate spiralling tendrils.
At this moment I am not sure how these elements would be held together, or how the fascinator would fit onto the head.

Wow! Lots of fabulous ideas Julia! I can't wait to see what you finally decide on.
ReplyDeleteLove your ideas Julia - I wonder if you have decided yet. Will look forward to watching your progress.
ReplyDelete